Quantcast
Channel: Irishserb's Miniatures Adventure
Viewing all 453 articles
Browse latest View live

Quality Castings 15mm M42 Duster

$
0
0
After doing some searching on the web for photos and finding nothing, I did a stupid thing and ordered miniatures without seeing them first.  Well, much to my surprise, this wild and crazy guy gambled right this time.  Tonight I received a couple of Quality Castings 15mm M42 Dusters from Warweb.

I must say that I am quite pleased with this model.  The detail is good, and the castings are pretty crisp.  It comes in eight pieces as seen in the photo below.


Hull assembly is very simple and the fit of the parts is quite good, with only a little flash on the parts.  The turret is a little trickier, but not too bad if you have a pic of an M42.


The turret is cast with the outer portion of the gun shields bent inward.  The sprues must be clipped out, and the gun shields bent upward into proper position.  Once in position the gun mount with the center portion of the shield will fit in place, and the guns tubes can be glued on.  The guns have pins on the ends, but the holes in the gun mount must be drilled out a little before gluing in place.  The view below shows after and before positions of the gun shields:


The turret comes in two pieces, a lower half and upper half, which join at a point below the turret ring.  There is a pin in the front of the lower portion to help in aligning the two halves. I filed the glued surfaces level before gluing, then filed lightly around the portion of the turret that rests below the turret ring.  With about 20 seconds work, it fit very nicely into the the hull.

Quality Castings models are sometimes a little smaller than some other manufacturers, so I took a couple size comparison photos:


The QC M42 is pictured with a QRF M47 medium tank, and one of my own 1/100 post war T34/85s.  In the top photo, there is an Old Glory US infantrymen from their Vietnam line standing to the rear of the M42.  The M42 was built on a modified M41 like tank chassis, and I have to say that I think it looks fine with respect to scale or size.  I did not take measurements  or calculate a scale for the M42, as I am not realy concerned with that.

Overall I am quite happy with the models and would recommend them to anyone needing some Cold War era air defense.  I ordered from Warweb on the Tuesday before Thanksgiving and received my package in eight days.  I received e-mail notification at the time of ordering, and at the time of shipping.  In all good service resulting in a happy customer.

That's all for now, more gamer psycho-babble at you later.

AAR6: Enter the Separatists

$
0
0
This is an After Action Report for the sixth battle in my African Imagi-nation campaign.  The last AAR was:
http://irishserb.blogspot.com/2011/07/aar5.html

Mugabian leadership had long supported the ULF rebels, as both parties wanted the Pettu tribal territory in  Uwanda to be re-united with the Pettu region in Mugabia.  This support consisted of both training and the supply of small arms and ammunition.  As the conflict between Uwanda and Mugabia heated up, regular conveys began visiting the rebel training camps.

While the ULF rebels were getting support from Mugabia, the Separatists were not.  A sub-group of the Pettu people, their goal was to free followers of their faith from the control of both  Uwanda and Mugabia, and they burdened both nations equally.  Without support, access to weapons was limited, so the Separatist leader authorized more aggressive actions to rectify the problem.

Akida had been selected for this important mission because of his training in the colonial militia before the independence of Mugabia.  A natural leader with good tactical vision, he was one of the brightest stars in the Separatist forces.

A view looking east, the Mugabian convey has just entered the table.
Separatist forces are in the woods to the left of the "S" curve.

The action was to be an ambush of the Mugabian weapons convoy to the ULF camp.  Though the convoys had escort by light armor and/or troops, thus far, they had met no resistance, and the Mugabians were expected to be complacent.  The plan was simple, destroy the escort, take the supplies.

A view looking west, as the lead AML60 saw things. 
The Separatists are ahead in the forest to the right.

Akida took 20 men for the Ambush,  if the convey was typical, they would let the lead armored car pass, destroy the infantry leading the trucks and  that following the trucks to trap them, kill any resistance, and take the supplies.

Separatist fighters from Rebel Miniatures

" Ahh, the convoy is as we expected.  Abdu is a good shot, this should go well.  Here they come. Let them pass...wait...armored car...wait...infantry carrier...wai...what is he doing? Not yet! Not yet!"

The lead AML60 as the convey proceeds through the "S" turn.

Abdu fired his RPG true, and hit the side of the BTR-60 just before it got to him.  Unfortunately, this put the convey too far east, and put the trailing armored car almost out of range of the other RPG gunner.    The hit was catastrophic, destroying the APC, and killing or injuring three quarters of the squad inside.  Those that could, bailed out, and immediately found themselves in a barrage of small arms fire.  Meanwhile, the rest of the separatists opened up on the convey, trying to immobilize the trucks.

The BTR60 is hit too soon by the RPG7 gunner.

Up ahead the lead AML60 turned around and began peppering the RPG launch pointed with 60mm rounds.  At the rear of the column, the separatist RPG gunner missed the trailing AML60, who in turn did not.

As seen from the trailing AML60,  ULF fighters disembark to engage Separatists in the forest to the right.

From this point, a gruesome exchange of small arms and 60mm fire, all at close range, killed and wounded most troops on both sides.  ULF fighters bailed out of the last truck,  surprising the Separatists, and adding to the carnage.  The Separatist reserve of six men moved toward the rear of the column, one of them found the RPG, still in serviceable condition, and hit the rear AML60.

The ULF fighters as seen by the Separatists.

At the front of the column, the AML60 and RPG gunner exchanged misses for a little while, before mutually annihilating each other.  Akida was hit in the process, and though he would live, would fight no more battles.

The Mugabian infantry were quickly killed, as were half of the rebels, whose surviving forces ran into the jungle.  The separatists probably would have broke as well, but the fight happened so fast, that they didn't have a chance to retreat.

Towards the end of shooting,  just before the ULF fighters retreat into the forest.

Suddenly it was quiet, and only the cracking fire and moaning of injured men was heard.  Only five separatists were left unhurt, out of the original 21 men.  Four ULF rebels lay dead, as did 9 of the Mugabia infantry; two were still alive, but badly wounded.  Dogo decided that they would live, should God will it, and that the Separatists had better get on with their own business.

Originally, the plan was to take only what they could carry, but there were eight wounded separatist fighters.  They loaded supplies and the injured into the former rebel truck, the only vehicle still serviceable.

As they left, Dogo thought, "If this is victory, I do not wish to experience defeat."

When word of the Separatist attack reached the Mugabian leadership, they were outraged.  This had not happened before, Uwanda must be behind it.  They would pay, for attacks in Mugabian territory would not be tolerated.


AAR7: Uwanda Strikes Back

$
0
0
In Uwanda, the elections were held, and a new face became  president.  President Danganyo was a charismatic man, who stressed that leadership and decisiveness was what had been lacking in dealing with Mugabia.  Once he had assumed office and been briefed on the situation, he decided that it was time to punish the ULF for opening the door to war.

Uwanda would strike back at the ULF by destroying one of its basecamps.  A camp near the town at Objective B11 was selected, not too far inside of Mugabia in Pettu territory.  The Uwanda airforce had been overflying Mugabian airspace, almost without interruption, and had good information about the base. 

View of the camp, the Uwandan commandos enter from the left.


The attack plan was simple, Uwnadan commandos would be inserted via helicopter near the the camp, make their way there in the early morning hours under the cover of darkness, and attack at dawn.  As it turned out, the president's plan was more aggressive than the helicopter pilots, who had "difficulties" until just before daylight, only crossing the border at about the time the attack should have started.


View of the camp from the southeast.


Another view from the southwest.

Still, the Uwandan troops were inserted without incident, and moved toward the base.  Everything proceeded well, until they bumped into a foot patrol outside the camp.  The advancing Uwandans had seen the ULF patrol moving generally away from them, but the patrol suddenly changed direction, and were very surprised after a moment.  Both sides shot simultaneously, but the Uwnadans had the innitiative and hit both of the ULF fighters.   There had been sounds of gunfire through he morning, as ULF men were on the range getting in some target practice, so the alarm wasn't immediately sounded.

The ULF foot patrol.

Unfortunately, only moments later, and with the Uwandans still out of position for the attack, one of the ULF guards managed to spot movement in the underbrush.   He watched for a moment before firing his RPG; the Uwandans were still not in position.

A watchful ULF guard.

Though the Uwndans had the first casualty, they quickly made progress against the surprised and confused ULF troops, who had no real expectation to be attacked at one of their bases.  Their primary reason for guarding their base was to keep locals from stealing food and medicine.

Though there was a lot of shooting, the Uwandans didn't start taking casualties until crossing the stream at the west end of the camp.  As they made it to the emplacements around the perimeter of the camp, they were surprised by the volume of fire, and by the Mugabian army advisers that began directing the defense.


Mugabian commandos advancing into the west end of the camp.

The fight was chaotic, as  half of the Uwandans never really got into the camp, and ULF fighters were running every which way, trying to obey the Mugabians and figure out where the Uwandans were.

The Uwandans caused a great deal of damage, peppering the camp with LAW rockets, destroying a jeep and buildings, and killing most of the ULF and Mugabian leaders and officers in the process.  Unfortunately, they were taking more casualties than the plan allowed for, and they could not advance on the retreating ULF fighters.


The camp with most of the leadership dead; ULF fighters begin to retreat.

The camp housed 53 ULF fighters and 9 Mugabian advisers at the time of the attack, 22 fighters and 6 advisers were lost, as were 11 Uwandan commandos; four would be seen in a seen in a hospital, having been taken prisoner.

In the end, the battle was not seen as a success by the Uwnadans.  Their pilots were not equipped for night operations, and on the ground their luck had not been great.  Still, the raid was a useful propaganda tool, and Mugabia now had to face that they did not, and could not control their airspace.  A rush was made to procure air detection and defence systems, but little was available, and it would take months of training before these could be brought on line.

Dragons for my Cold Warriors

$
0
0
Though I'm behind on most of my gaming projects, I ended up working ahead a little on infantry for next year's Cold War project.  For the most part I decided to use Old Glory Vietnam figs for my late 1970's US troops.  One of the things that is missing from the OG Vietnam figs (if being used in the late 1970s and early 1980s) are M47 Dragon anti-tank weapons. 


As it turns out, there are not a lot of options for M47 Dragon gunners in 15mm for these late '70s Cold Warriors.  Not too long ago, I was reminded in a post on another blog, http://daddyslittlemen.blogspot.com/2011/01/israeli-truck-m325-nun-nun-and-support.html (though it is referred to as a Command Decision fig, I think it is the QC pose)  about Quality Castings 15mm Dragon gunner figures.  The Dragon gunner is one of the poses in the Post-WWII American infantry pack captioned "Modern 1980's Infantry AT/AA Weapons. I got mine through Warweb at 24 figures for $8.00.  There were six Dragon gunners in the pack.  There are also figures with Stinger AA missile launchers, an M72 LAW rocket, a prone figure firing what I think is an AT4 on a tripod, and a kneeling spotter with binoculars.  Since they are not pictured on the Warweb or Quality Castings sites, the following three photos show the figures from the pack.


The first photo is from slightly above the figures, the last two show both sides of the figs from a directly in front of the figs.  The figures are cleanly cast and pretty well detailed.  The figures are depicted with mid 1980s PASGT helmets that replaced the M1 steel pot.

Older Quality Castings figures tend to be a little smaller than most other manufacturers figs (I have about 1200 WWII infantry from them purchased between 1988 and 1992 representing six nations).  I purchased some of the QC Modern Soviets a few years back,  mostly gun and heavy weapons crew type figures, and they were clearly shorter and  more slight than the QRF and MJ Miniatures Soviet infantry that I had.  So, I figured that I'd compare the QC Modern US infantry to other makes of  Vietnam era and modern US figs that I had.


The figures are shown front and back, and from left to right are Old Glory Modern US, Peter Pig USMC, Quality Castings  M47 Dragon Gunner(kneeling), Old Glory Vietnam US Infantry with Helmet, OG US Infantry  (might be from the Command and Weapons pack), QC Stinger gunner. 

The last fig, the QC Stinger figure is a touch shorter than the other standing figs and more slight in stature.  It is very similar to the OG modern US fig, and noticeably smaller then the Peter Pig Marine, the heftiest of the bunch (also with the bulkiest body armor and gear.

With respect to size, I don't think the Dragon gunner looks particularly bad next to the Old Glory and Peter Pig figures. As a matter of fact, I think it looks fine next to the others.  The Stinger figure might  look a touch small, but I think would pass if used with the OG modern US figs.

Originally, my intent was to do head-swaps with the Dragon gunners, replacing the QC heads with the more modern PASGT helmets with heads from Old Glory figs with M1 helmets.  But the more I looked at the QC figs, I don't think I'm going to do the head-swap. 


I assume that the Old Glory figs have the MICH helmet (though at this scale, they could be also be the PASGT).  I think they were released prior to the introduction of the ACR, but could be wrong.  The Quality Castings figure is sculpted with a PASGT  based on when they were first produced, but the  details of the helmet are not as dramatic as those of the OG helemt, and though not quite as deep, they are not tremendously different from the M1 helmet on the Vietnam figs.  Since the Dragon gunner's helmet is cast into the side of the M47 launch tube, I going to save the time of cutting away the helmet and shaping the replacement, and just paint them as late 1970s/early 1980s figs in M1s with the Mitchel pattern covers.

Hope the photos might be helpful to others.

15mm Odds and Ends: M42, S-60, M113A1

$
0
0
Not getting too much done on the hobby front with with the holidays happening and all, but thought I'd post a few pics and whatnot to sort of tie up some loose ends.

First up are a couple of pics of the  Quality Castings M42 with a basic paint job:


The figure in the top photo is from Peter Pig's AK-47 line of figs.  Below is pic from overhead comparing it with a Quality Castings ZSU23/4 and a QRF ZSU-57/2.


Next up is QRF's Soviet S-60 57mm anti-aircraft gun from their Post War line of vehicles and figures.  Last I checked, QRF didn't have a photo of this on their site, so thought I'd post one.


This is actually quite a nice model, and I did not do it any justice.  It is very busy, with very nicely detailed,  finely cast parts.  It is fiddly, and I left a few pieces off, rather than break them off later.  Still, the photo gives some idea of the quality of the model itself.


Lastly, I finally added my M113A1 to my website at:   https://sites.google.com/site/irishserbsminiatures/


It is cast in resin and comes unpainted and unassembled in 7 pieces.  The commander's hatch can be positioned open or closed, and can be built with or without the gun-shield.  Note that the gun mount is fiddly, and that I had best success in building the model by gluing the the mount to the gun, and then gluing the gun assembly onto the commander's cupola. 

Hope everybody has a Merry Christmas and great Holiday Season.

2011 in Review, and Plans for 2012

$
0
0
I don't imagine my ramblings here will be of much interest to anyone but me, but I do find this to be a somewhat motivational process, so I shall indeed continue with this totally unoriginal idea.  If nothing else, I've dug out a few old photos to include that you may not have seen before. 

2011 was sort of a rebirth in the hobby for me.  I bought about ten times as many figs as in 2010, painted a couple hundred more than I bought, and played twice as many games (6, as opposed to 3 in 2010).  Still, when compared to years past, it was just not like the old days.

Some projects saw a lot of progress, like my 15mm moderns, others like Vietnam, and much of my sci-fi interests were stuck in stasis.  I've also considered that I may need to further streamline some of my interests to ever have hope of completing anything ( I purged 12 other periods a few years back).  I'm going to drop a few things to start this year, see how things progress by mid-year, and make some bigger changes if need be.

20mm Vietnam
Riverine terrain- Added palm trees and some foliage pieces.
Village- completed the two Britannia hoochs that I have.
Riverside Bunkers- Completed some research, and might have enough to build from, but no model work completed.

No progress was made on the following, so all of the following are on the slate for 2012:
The Old Church
M113 and M48- Completed, but need re-weathered due to painting mishap
Civilians
Gun truck
Troop Trucks- Purchased
Jeeps
Also for 2012, I'll add to the list:
OV-10 Bronco- Purchased


15mm World War Two
Add decals and weather about 70 US vehicles- No progress in 2011, other than  Decals have been purchased.
For 2012:
US infantry- Fill in a few voids for my armored infantry company, and motorised infantry company.
57mm AT guns- Again to complete the armored infantry company.


15mm Modern Africa (and elsewhere)
15mm Modern Africa and 15mm modern in general is where I made my biggest gains.
T34/85- Completed master and cast and painted a company plus for modern Africa.
BTR152K- Completed last of a company of these early in the year.

M2A2- Completed casting and painted a platoon, with the rest of the company still awaiting paint.
AAV7A1-  Completed master, cast and painted enough for my Marines
ERC-90- Completed master and painted a platoon with the rest of the company awaiting paint.

Also completed:
Added around 50 15mm militia troops.
Mugabia Air defense- Completed SA8, SA9s, and a variety of towed AA guns (57mm, 23mm, 14.5mm)
T-55- Completed a company plus of T-55
PT-76- Completed a platoon of light tanks.
US Marines- Painted a company of Marines
Cuban Advisers- Painted a platoon of "advisers"
VBLs- Painted enough VBLs for a recon company
M1114 Humvees- Finally assembled and painted my own Humvees, around 25 of the various models.
Presidential Guard- Painted the Mugabian Presidential Guard, about 30 figs.
Aircraft Stands- Built my first aircraft stands.
Aircraft- Completed 2x Strikemaster, 2xG91, 2x Mig21,  and a C-47.
Uwanda Air Defense- Completed two M42 Dusters to give Uwanda some defense against against Mugabian aircraft.

For 2012:
Uwanda Helicopters- Are setting on the bench right now to be built.
Airport
Presidential palace
Houses
Barricades

Panhard M3
VLRA


15mm Afghanistan (Soviet-Afgan War)
DRA Infantry- Completed a platoon of Afghan troops to fight along side the Soviets.

For 2012 (still):
Gaz66 - Complete master and cast a bunch of trucks for Soviet convoys and various duties in Afghanistan and Africa. Slightly more than barely started.


28mm Science Fiction
With the exception of my post-apoc terrain, my sci-fi projects were completely ignored in 2011
Post Apocalypse Terrain - I've made great progress on this, but had to put it aside in February, and haven't been able to make any significant progress since.  I'm planning for it to be a winter project, so hopefully, I will make some headway soon.

For 2012:
"Out West Town" - Complete the buildings that I have had half done in the basement for the last two years. Think route 66.

"The Hood" - Based on part of my childhood stomping-grounds, will provide the core of an inner city for contemporary/near future/ post apoc games. Involves completing several buildings already started and adding a few more.

Some of the buildings that I started some time ago for "The Hood". 
All made of sheet styrene.

 Birdman Museum - Complete the birdman museum for the "Out West Town". The museum is inspired by those many roadside tourist trap museums that I saw as a child and will feature artifacts of the ancient "birdmen". Much to the surprise of the town's people, the birdmen will be coming for their holy relics.
Scavenger Village Expansion - Additions to my post apocalypse scavenger village will include a couple ruined  buildings/hovels, debris/junk heaps, and other various detail items for the village.
Contemporary Police Station - Build a police station for "The Hood". It may or may not double as a station for the "Out West" town.

A game set-up using some of the "scavenger village" pieces.

A close-up of one of the modular bunkers/towers. 
The whole thing comes apart allowing the bunkers and towers to
 be use separately as well

Near Future Police station - Build either a new structure or more probably a futuristic addition to the contemporary police station for various near future scenarios.

Zombies - Buy and paint the Cold War Zombies.
Wasp CS Aircraft - Build the "Wasp" close support craft that I designed a couple of years back. It was literally inspired by watching a couple of wasps that were hanging around the back porch a couple of years ago.

Beetle Utility Transport - Build the "Beetle" transport aircraft , a companion to the Wasp, for my Imperial troops. Sort of a sci-fi "Huey".

Imperial APCs - Still need to scratch-build APCs for my "Imperials".


New for 2012 (Because I don't have enough on my plate already):

The Cold War gets Hot:1977-1982
I'm a child of the Cold War, and I guess in a weird way, I miss the stability of the constant threat of nuclear incineration.  As a kid, I was aware of the threat from a fairly young age ( heck, I was 5 years old, when I began considering whether I was going to go to Vietnam or Canada, when I got drafted), but never seriously believed that the adults of the world would do something so stupid as World War III.  Silly me.  Anyway, now that it is all a memory,  I want to play out some the battles that never were. Despite being behind on everything that I wanted to do in 2011, I got a jump start on my Cold War project.  The advantage of this project is that many of my Afghan war and African items can be used in the Cold War era games (Soviet armor and infantry, older US equipment, etc) So here is were it stands and the plans for 2012.
Completed in 2011
M113A1- Master completed, company cast, platoon painted.
US Infantry- Infantry Platoon and some support units painted, missing a few figs, but basically done.

For 2012 (Vehicles involve either making a master and casting them or buying the miniatures):
T62
T72
BMP1
BMP2
M163
M125
M150
M901
M1
M60A1
M60A2
Soviet MR infantry- Round out 2 Soviet MR companies
Soviet Airborne- Round out one Soviet Para company


28mm Colonial Adventure
Some years ago, I had put together a colonial era adventure game (that I simply called "Ponape") set in the Pacific, largely inspired by the movie "Nate and Hayes", greatly expanded, and with a touch of Victorian sci-fi added in.  I ran the game several times at  local HMGS conventions and at Origins once, but got put-off a bit after run-ins with the "not historical enough" crowd.  Some outside circumstances impacted my convention going opportunities about the same time, and the game has been stacked in the corner of my garage for the last 7-8 years.  I almost sold off the stuff a couple of years back.  Anyway, I think I'm going to start sorting through the stuff, give some of it a face lift, and move it from my "never played" games to my rotation of "hardly ever played" games.

An early version of "Ponape" from the native side of the island. showing the
native village, jungle, and town, and Spanish fortress in the background.

A better view of the fortress, with one of the the 28mm scratch-built ships in
the foreground.

Research Project: Kursk.
I've recently taken a particular interest in gaming Kursk in 1/285, and after poking around on TMP and elsewhere, have put together a reading list and list of other resources to go through.  I already have a large portion of the miniatures that I'd need,  so this will primarily be a terrain project if it comes to anything.

France 1940 Terrain Project 1/285:
If Kursk does not materialize, I may go back to one of my long time interests, and build one of the 1940 battlefields that I've wanted to do for so long.  Stonne is a possible target, as are six other locations. The research is done, as are the majority of miniatures.  I actually started this a few years back, ordering a bunch of micro-scale buildings, but they had so many air bubbles, that it was faster to scratch-build my own, than fix the purchased models.  I ended up getting burnt-out on the buildings, and benched the project.


Some of the 1/285 buildings that I made during my first go at a 1940 battlefield.

Summary
Though,  they weren't all on my list at the start of the year, I managed to complete 22 "projects" of varying scope during 2011.  A tremendous increase over the 6 completed in 2010.  Hopefully I can improve further on the trend for 2012. 

Ghosts of Christmas Games Past

$
0
0
The day after Christmas we traveled to visit my wife's family, which for me includes a visit with an old friend and gamer located nearby the in-laws.  As it turned out, another of the old gang happened to be in town, so we had a mini-reunion of the old game group and couldn't pass up the opportunity to push some lead and throw dice.

Long ago, when I was still in college, and had no money for figs, I was a member of a wonderful group of gamers in Canton, Ohio.  Some number of us got together almost daily, and we must have played something on the order of 250 games per year.  In time, employment would eventually take most of us to the farthest reaches of the empire, and our group was no more.

Though our daily battles and silly antics are a thing of memory, last Monday was a flashback to my golden age of gaming.  Mark, who I hadn't actually seen in seven years or more, showed up at Craig's (some of you may know him as Gaming Models Craig) and we played a pick-up WWII game.  Mark must have taken every 15mm WWII German miniature that Craig owns, and I (not paying too much attention to what Mark was doing) took a US Armored Infantry company a platoon of Shermans and small recon element.

A view of the battlefield thrown together by Craig. 
His table is something like 7'x14' and he uses modular foam terrain.

As we started setting up the game, I realized that I was outnumbered something like 30 to 1, so I added an Easy Eight company and four tank destroyers.  I also had air and artillery support available, so now I was only ridiculously out-numbered.

As we were setting up, we were swallowed by an avalanche of silly jokes and bad puns,. I t was 1983 again. 

Mark set up maybe  150 German vehicles and guns and the associated infantry. There were at least ten Tigers among his hoard.  I entered the table with a jeep and an armored car and proclaimed this land liberated. After a few turns of movement, the American and German lead elements clashed, with a handful of jeeps and light armored vehicles fighting an intense micro-battle on this huge table with many hundreds of miniatures.

My recon successfully absorbing a significant portion of the German ammo supply.

A squad of US infantry trying to move around the German right flank. 
This didn't go quite as planned.

Most of the recon elements mutually annihilated, the heavy stuff begins to advance.

The game developed, with the heavier elements moving into range,  and the E8s got an early edge, though my best tank turned out to be the P47.


The Germans advanced, while my Americans stalled , being halted by a combination of German guns and gamer humor. the early success of the easy eights gave way to the mass of Panzers, Stugs and Tigers.  The Shermans still got the occasional lucky shot, but in the end, I was saved by the bell, as time expired, and we had to end our silly holiday battle.


All in all, it was a wonderful time, gaming, laughing, good food, and most of all, great friends. 

Roll Call in 15mm

$
0
0
In November, I got the grand idea of rounding out some infantry units for   my modern armies, so that I could finally play some of the games that I am forever putting off.  Additionally, I figured this would be a good way to come up with some suggestions, when my wife asked about what I might like for Christmas.


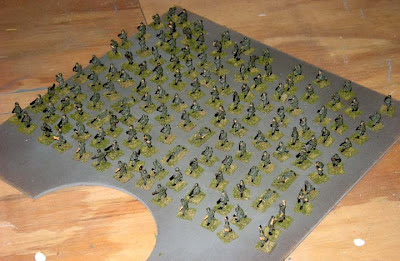
November turned into December, the holidays came to pass, rounding out some of my modern armies turned into inventorying all of my moderns, and then my World War II armies as well.  And since the holidays were happening, progress was slow and extremely interrupted.  So here I am 10 weeks later, and my table is covered with 3757 15mm modern and WWII infantry, and I am nowhere near filling out the gaps in my units. And since I have nothing better to offer, here they are, my 15mm minions:


Of the 3757 figs, about 3300 are painted  representing at least 24 different
armies with figs from seven manufacturers.


With Christmas came  figs to fill out a couple of the armies, and as I slowly sorted through my heap, I found a number of WWII figs that I had picked up over the years for this purpose, but then had buried in my heap and forgotten about. 


Over 600 WWII Germans between early and late war.


About 200 Mujahideen for the Soviet-Afghan war.


Forty or so Cuban Advisers for my modern Africa games.

I then started ordering figs to round out more of the armies with Cold War Soviets coming from QRF, and my first order to Rebel Miniatures to fill out my  1990s US Army Company.   Imagine my surprise, when I found that my existing figures were not from Rebel.  And say "Welcome" to my new US army of the 2000s.

The old figs must have been from Flashpoint (I'm guessing their US Army Rangers, painted below), as they are not the Rebel Minis figs (unpainted below) and I'm not aware of any other sources.  Here is a pic comparing a few of the figs:


I had some other Rebel Miniatures figs that I bought at conventions, but had never ordered on-line from them before.  Let me say that service was outstanding.  First the miniatures are fantastic quality, very finely detailed, and even better than the Peter Pig USMC figs, which are probably the best modern figs that I purchased previously.  Comms were great, and the order arrived three days after ordering.  I couldn't ask for more.

Anyway, despite the screw-up, I quite like my new army, though they set on my table, with 3000 others, waiting for a few moments of attention with a paintbrush and flock.  Despite finally getting to put a little time in on my troops today, my backlog will just get worse, as any day now, a hundred more Soviets will be invading my mailbox.

Hand on the Mend

$
0
0
When the tendons in my right hand inflated to twice their normal volume  (or more) a few weeks back, I had no idea that I would be sidelined for this long.  Beyond the pain from the injury, the allergic reaction to medication, and the horror that is daytime TV,  I have discovered that not being able to work on my hobby is probably the worst part of all (though trying to tie a shoe lace with one hand is a close second).

Clearly, my miniatures hobby keeps me sane.  Unfortunately, shooting at Nancy Grace on my TV with a battery powered Nerf gun has not (though I have become a decent left handed shot). 

Over the last week, my hand has started to get better.  I'm not sure how long it will take to get back to 100 percent, but I am starting to get some things done.   I've done a touch of casting, and have started shipping orders to those who have been waiting so patiently for their 15mm vehicles.  I've also used some of the time to get a lot a research done for games and 15mm vehicles.

For those who are still waiting for vehicles, they will start arriving shortly, then hopefully we will see some progress on some hobby projects, and maybe even a worthwhile post. 

Thank you to those who have been so kind and so patient over this past month.

28mm Sci-Fi Bunker Complex Revisited (Photo heavy)

$
0
0
This is a re-post of the pics from my 28mm sci-fi bunker complex from my old website.   Over the last couple of weeks, I've been toying with design ideas for my post-apoc terrain, and got some of my bunker bits out, while considering how I might fit them into my PA world.  'veI had a few requests to re-post some of the pics. including one this past week, and figured since I can't do much else right now, that I might as well do so.


The first stage of the bunker complex was built over the Thanksgiving holiday about five years back.  It was originally an objective for my daughter's space orks, with visions of expanding it for all sorts of sci-fi and PA gaming.  The most important aspect was the modular design that would permit adaptation to the needs of various games and settings. 


The basic layout was drawn onto sheet styrene, which would act of the floor for some of the modules, and a base for the foam construction otherwise.  The figures are 28mm Imperial Guard to give a sense of scale.


The walls and roof sections were constructed from blue polystyrene insulation board, with the various strips and sheets of the foam cut on a bandsaw.  The foam shapes were cut to size, glued with artists matte medium, and pinned until dry with straight-pins.


This view shows some of the pins still in place, holding layers on foam strips on the front of one of the smaller gatling laser turrets.


This is a view with foam construction complete, and after a coat of acrylic paste has been painted on to protect the foam a little.


A view of the overall base painted with artist's acrylics.  Below is another shot of the painted base.


Next step was to build the weapons for the turrets and rooftop.


The last four pics are views of the air defense mount for the rooftop.  The gun was scratch-built from styrene sheet, strips, and shapes from Plastruct and Evergreen Plastics.


Above are four views of the gatling lasers for the smaller turrets.  The gun shield was made from a piece of acrylic tube.


Above is a view of one of the main guns for the two double turrets early in the construction.  Unfortunately, I can't find any other pics of these guns after more work was completed.


An overall view with the guns still in process.  In this configuration the model measures roughly 4'x5'.


I also made some obstacles to place around the complex.  Dragons teeth for tracked and wheeled vehicles and the structural thingies to annoy skimmers, grav and hovering vehicles.


The last two shots are of the first stage of construction more or less complete.  The last photo shows the business end of one of the primary double turrets.

A little over a year later, I added the second stage of the bunker complex, which consisted of 29 new pieces.  These included more tunnel sections, entrances,  intersections for the tunnels, and open  fighting positions for the infantry.


The two photos above show second stage construction incorporated with first stage turrets, and a communications tower that I made a year or so prior to the first stage of the bunker complex.


I also added a bunch more obstacles, including some to represent battle damaged obstacles.


All of the new sections from the second stage of construction are shown above.  I also made a few sections with battle damage.  The new modules measure about seven feet in length, when arranged as in the photo above.


The view above shows some the construction detail in the new modules.  Just beyond the two open fighting positions in the foreground is a four-way tunnel intersection.  Covering the front entrance is a free standing bulkhead.  I made a number of these bulkheads to cap unused doorways, and to place in front of entrances to protect them from direct assault.  The fighting position on top of the 4-way module is also a free standing piece.


A view of the battle damaged sections.   There are two types of open position modules, one has a doorway/walkway to the rear, shown in the nearest unit, and the other has a solid wall in back.  I also had to make end caps for the fighting positions.


The last three shots are of the battle damaged sections.  I made bunch of broken concrete debris, but never could settle on how to attach or place them, so they remain loose chunks that my cats just love to bat around.

Even before the second stage was complete, I had already design pieces for the third stage, including corner bastions for the open positions, checkpoints, small blockhouses to cap tunnel sections, smaller watchtowers, and various clutter for the rooftops, including equipment, antennae, smaller air defence guns and missiles,etc.

A fourth stage was to include about a dozen more damaged sections including one of each style of turret, but after I completed the second stage, my daughter's interest in spaceorks started to fade.  So for now, the last two stages exist only as a dozen pages of notes and plans.  Hopefully, as I explore the role that the bunker might play in my post-apoc games, I will find need to complete some portion of the last two stages.

Hope the pics are of some interest or inspiration, if nothing else, I had a lot of fun building it.

Back in Action

$
0
0
Actually, I have been for about two weeks now, but have been too busy to post anything.   Anyway, I've been a casting fool, trying to get everyones' vehicle orders out, manage to paint some 15mm French infantry for 1940 in between (ran out of resin for a couple of days), and generally am catching up on everything.  I've even done some work on some new 15mm masters, got about 20 vehicles that I desperately want to finish this year.

It really does feel good to be back, and I promise to have some more interesting posts in the coming days.

Those First Steps...

$
0
0
Miniatures enthusiasts all have them, those first steps down the hobby path of military miniatures.  For me it started in the late 1960s, but would be the late 1970s before I played a proper wargame or miniatures game. 


"The hobby" in its earliest form came to me during my fifth Christmas by way of Marx Toys' Fort Apache and Viking Castle.  The fort, a vinyl carrying case that folded out into an old west fort filled with cowboys and Indians, and a similar metal castle/carrying case filled with plastic knights and vikings.  There were no rules in those days, and the "good guys" always won.  Unfortunately, the popularity of these toys was short lived, as they had to share time with Toggle Blocks, Billy Blastoff, and Matchbox cars.  A handful of the Knights and Vikings currently reside in my attic, while their former companions were lost in a move in the 1970s.


The following summer, I was given some "old", lightly used, early 1960s G.I. Joes.  These 12 inch tall G.I. Joes were received with less excitement than the Cowboy and Viking sets, but managed to stay with me a lot longer, being one of four staple toys that would prepare me for the future.


While a couple of G.I. Joes and their M1 rifles grew into a squad with heavy weapons and a Jeep with a recoiless rifle, the interest in knights and vikings was rekindled by Marx toys.  Christmas 1971 featured the arrival of the Brave Knights, featuring Sir Stuart the Silver Knight doing battle with Eric the Viking.  A resurgence of interest of the earlier toys  resulted in the smaller plastic Knights and Vikings doing battle a few more times, while G.I. Joe dominated the time not taken up the the Brave Knights. 

Unfortunately, my G.I. Joes were sold off to support my sports card habit in the later 1970s, only a few weapons remain, sharing space with those few knights and vikings in the attic. Eric the Viking suffered a catastrophic structural failure after some years of battle with his arms and legs falling off, but Sir Stuart still protects the realm.


Christmas of '73 brought the last portion, and probably the most important,  to the pre-gaming training program.  A boxed Marx World War II set with Germans and Americans opened up a whole new battlefield.  A battlefield mightily encouraged by films such as Patton, and Battle of the Bulge. 


The Marx playset consisted of US and German troops, M26 tanks and M3 halftracks for the Americans, and Panthers and six-wheeled APCs that looked more like Soviet BTR-152s, than SdKfz 251s for the Germans.  The vehicles were in a smaller scale than the infantry, something close to 1/48th I would guess.  Of all of the military toys, these brought the most intense period of play, and would eventually inspire my first thoughts of rules for playing war.  The rules were incomplete and unrealistic, but were the first hint at a rich future.

My WWII Marx set would grow to over 500 troops, and eventually include die-cast P47s, a plastic Sea Stallion, Saladin armored cars, and an assortment of other similar toys over the next couple of years.  A significant number of Vietnam era infantry would reinforce their WWII counterparts in the war against the Germans.


In addition to these toys, the period spanning the early and mid 1970s would also feature "playing army" with toy guns.  My friends and I would run around the neighborhood shooting each other with various old west and, WWII, and modern era toy guns for hours on end.  Getting shot consisted of falling down in the most dramatic fashion, counting to ten as fast as you could, and rejoining the battle.

Christmas 1973 was also when I was introduced to the names Chamberlain and Ellis with the first of my "tank books".


These two titles would also be accompanied by Beekman's History of the World Wars series book Tanks and Weapons of WWII.  These three books would launch a reading frenzy from the public and school libraries of the books by C.B. Coby and Robert Leckie.  Along with the reading, movies ranging from Kelly's Heroes to Battleground would continue to cultivate my interest, until I would make the jump from children's toys to a proper wargame during the summer of 1976.


Like so many other gamers, Avalon Hill would introduce me to the  hobby of "Wargaming".  A $2.00 purchase at a garage sale would land me a copy of France 1940 and begin a love affair with French armor that has lasted to this day.  About three years later, my friend Mark would introduce me to Heritage's Panzer Troops.  It was designed for use with 15mm metal figs, but we used 1/72nd scale Airfix and other plastics. 

Though I would play other boardgamesfrom Avalon Hill, Yaquinto, and others, and explore role-playing via Dungeons and Dragons and Twilight 2000, before diving completely into miniatures, I knew from my first Panzer Troops game, that miniatures gaming was the path for me.  Or maybe, I just began to recognize that it was the path that I had always followed. 


Roll Call II: Light at the End of the Tunnel

$
0
0
Back in January, when I wrote my original "Roll Call" post, I knew that it would take awhile to finish my infantry project, but I still didn't understand the scope of what I had gotten myself into.  As it turned out, instead of needing 200-300 figs to round out the various units, I would need five times that.  In a year burdened by health issues and a crazy work schedule, progress has been slow.

It started out with this:


There were 38 cardboard trays with 3757 figs waiting for attention.  Since then I've added (as near as I can figure) 631 more infantry on about 8 more trays.   The figs took over my main gaming and work table in addition to my normal painting space, and basically brought a halt to any other gaming activity.

I've been squeezing in painting sessions whenever I can, but like I said above, there have been some prolonged and frequent  interruptions.  My typical painting session only lasts 10-15 minutes, and I've only had a few days when I could work as long as an hour. 

Yesterday I painted my 1100th figure of the year and put away the 40th tray of figs.  I need to add about a hundred more figs, but am down to six trays (with only about 100 of 300 figs needing paint), and got my big table back yesterday.


The project isn't done yet, but finally, I can see the light at the end of the tunnel.

A Few Soviets for the Cold War

$
0
0
July 4th turned out to be a pretty open day for me, so I hid from the summer heat and got some work done in the basement. I decided to try to clear some of the half finished stuff off of my various work spaces and did a bunch of painting, including a few vehicles for my Cold war Soviets.  Paint jobs are basic, but I figured that I'd share some pics as a lot of these aren't shown on the manufacturer's (particularly Old Glory's) website.

Here are three shiny new T-72s ready to protect the USSR from NATO aggression.  These are from Old Glory pack number PW-706.


The T-72s consisted of pretty clean castings and went together with out too much fuss.  A little filling was needed around the gun mount, and the commanders hatch was just a touch fiddly.  The hatch can be attached open or closed and mounted crew figures are included.


Next are some BRDM2 with AT5 anti tanks missiles, also made by Old Glory from pack number PW-732B.


These consisted of very clean castings and take minimal assembly work.  The tires are cast in place, and the missile launcher only adds two pieces.

Last of the independence day batch was a lone BTR60PB (item no. MSVI04) and a few Soviet troops (item no. MSI01 Motor Rifle Infantry) from QRF.


The BTR60PB came in five pieces.  Assembly was quite simple with minimal clean-up of light flash on the hull.

Here are a couple more Old Glory models that I had done earlier this year.   BRDM with SA9 anti-aircraft missiles (PW-732C)


The BRDM/SA9 was similar to the AT5 variant with minimal clean-up and assembly.  A very nice model, though I need to give mine a little more painting attention.

And, the PT-76 light tank (PW-735).


The PT76s required a little filling of recesses in what should be flat hull sides, but otherwise were easy to assemble and make for nice looking models.

Next up will be my US Army Cold Warriors, as my Soviets currently have nobody to spar with.

My First Company of Cold Warriors

$
0
0
I just finished my first company of 15mm US Army Mechanized Infantry troops for the 1978-1981 time frame, and thought I'd share a few pics and a little psycho-babble.  I still need most of the M113s, M150s, and M125s; but the dudes are done.


I found a number of variations of possible TO&E for these guys, and got some great input from the guys on the Yahoo TO&Es e-group to clear up some of my fuzziness ( http://games.groups.yahoo.com/group/TOandEs/ ).  I ended up with PHQs with 9x figs, 2x M60 MGs, and three squads per platoon with 11x men, 1x M60 MG, and 2x GLs.  As these guys will be defending Europe from the tank heavy "Red Menace", two out of three squads have a Dragon anti-tank missile launcher. 


About half of the figs are figs from Old Glory's CDVN-01 "US Infantry in Helmets",with most of the remainder from Peter Pig's Vietnam range (M60 gunners and grenade launchers, plus a few riflemen).  The GLs are all M79s, until somebody releases the appropriate figs with M16/M203s. The  Dragon gunners from Quality Castings "Modern 1980's Infantry AT/AA Weapons" pack (technically the wrong helmet/uniform discussed here in a previous post, December 2011).


I settled on painting them in OG107 green uniforms and ERDL camo helmets, matching Vallejo paint as best I could with period gear that I own.  Here are the Vallejo paints that I used:


Uniform - 893 US Dark Green.
Equipment - 1:1 of 893 US Dark Green and 890 reflective Green or 1:1 of US Dark Green and 886 Green Grey.
ERDL Helmet Cover -  base coat 2:3  893 US Dark Green and 886 Green Grey with camo of 889 US Olive, 890 Reflective Green, and Black.


Old Glory figs above.
Peter Pig figs above

A mix of Quality Castings (Dragon gunner), Peter Pig (LAW and M79), and OG otherwise.
Probably the most important thing that can be gained from the photos above is that the figures mix pretty seamlessly with none particularly standing out due to size or sculpting style.

My Turn at Painting 15mm ACUs

$
0
0
Well, here is my first squad of 15mm US Army figs (Rebel Minis) in ACUs.  I went to the local surplus store and looked at used and new uniforms and gear,  made notes and took some pics, but it didn't help.  I picked the colors closest to the most common colors (there was variation, even in new product), painted a couple of figs, and it didn't look right at all, did that a couple more times before giving up on doing it right.  So here they are, right or wrong, good or bad ( mostly bad).


I ended up using Vallejo 987 Medium Grey for the base coat, and Vallejo 886 Green Grey and 830 German WWII Green for the grey/green camo, applying with a stipple method using a beat up brush.  They appear slightly darker in person, though it doesn't help much.  I may just finish the platoon in ACU, rather than the whole company, and give a try to multicam for the next platoon.  I don't know.  Right now I'm just frustrated.  Digial camo is just killing me.


The Ships of Ponape: 28mm Colonial Gunboats

$
0
0
Some years ago, probably sometime in 1999, I began working on a 28mm colonial adventure game set in the South Pacific.  The idea was born roughly 17 years earlier, while watching the the movie Nate and Hayes.  The game was conceived as a Victorian adventure with miniatures, incorporating roleplaying, set generally in Micronesia.   The game, a sort of Darkest Pacifica,  included military contingents from various navies, shippers, traders, natives (both cannibals and not), antiquarian explorers, black-birders, gun-runners, pirates, jungle critters, mad scientists, dinosaurs, and anything else I could think to through in.

Players would run a faction (could be pirates, military contingents or various civilian groups) with around 12-25 figures, with a unique objective, and cooperate/trade/cheat/kill each other as required in an effort to achieve their objective.   Games would be loosely set in the 1880-1900 time frame, and most took place on a Spanish controlled island in the South Pacific.  I called the game "Ponape" after the island identified in the movie by the character, Ben Pease.

Anyway, while trying to reduce the number of old CDs and DVDs stacked around my computer, I recently came across a bunch of photos of the Ponape games and of the ships that I built for the various factions in the game.  Since I'm not really working on anything blog-worthy at the moment, I've broken the photos up by subject, and will post them in three or four blog entries over the next few days.  Here is the first, my 28mm colonial gunboats, ships,  and floaty things for getting around the Pacific.

The ship models are all caricatures of real ships.  Most are scratch-built from styrene sheet and/or bass wood.  I tried to make most spaces above the main deck, the bridge, and fighting areas of the ships accessible to players and figs.  The first ship was the Spanish gunboat, the General Concha.


The main gun was scratch-built from styrene sheet, strips, and tubing from Evergreen Plastic.


My version of the General Concha had a single 4,7 inch gun forward,  quick firing 3 pounders each broadside, and machinegun aft.  This is a picture of her in the first convention run of Ponape at Drums Along the Maumee 2000 in Toledo, Ohio.  I had forgotten my "water" drop cloth, so the bay featured a lovely wood grain  pattern. 

Possibly my favorite ship was the Euterpe, an Italian  torpedo boat, that I built for one of the guys.


The Euterpe is shown next the the General Concha.  She was so small that she  is actually just about a full size model in 28mm.  Besides the two torpedoes (made by Jack Shaw), she had a twin barrelled 25mm Nordenfelt, which I added after the initial delivery of the model. 

Shortly after building the Spanish boat, I added an American gunboat, and a French torpedo boat destroyer.  Unfortunately, I don't have too many photos of them.


This is the French torpedo boat destroyer, the Dunois, under construction.  My version would feature four 9-pounders.  She was heavily damaged while in my trunk, when my car was rear ended several years ago.  She has silently set on my workbench awaiting repair for at least six years.

Here are a couple more pics of the Dunois and the American gunboat, whose namesake I cannot remember at the moment.


Though they don't show up in the photos, the American ship (black hull with white superstructure in the foreground) has two guns forward in sponsons in the hull.  The entire main deck lifts off to expose the compartments below. 

The sailing ship was a quickie model slapped together from bass wood, and loosely based on a ship from Nate and Hayes.

Last is the German airship.  She never received proper detailing and was the first step into VSF for the Ponape game.


That is my daughter proudly presenting the airship many years ago.  The ship could be armed with two guns, either machineguns or 1 pounders.  The gondola was designed to be detached and could be affixed to a winged flying affair that converted it into the world's first seaplane.  The winged structure sets in a box, somewhere in my basement, never completed.

That's it for the ships.  Next up will be the island of Ponape.


Ponape: A Pacific Island for Colonial Gaming

$
0
0
Like the Gunboats in my previous post, my island setting of Ponape is a caricature of features ranging from Australia to China through Melanesia to Micronesia.  Some of it is pure fiction, some things out of place, but all things in the spirit of the game.

The island started as a list; a port, a coast, a fortress, a town, some rough terrain, a native village.  Quickly it evolved into a map designed to fit on a large game table.  At a minimum, the table would need to be 10'x5', preferably 12'x6'.  The features of the terrain dictated a modular design, though less flexible than my typical game terrain.  In its initial form, Ponape featured a Spanish fortress at the "west" end of the island, overlooking a bay with a dock and small town.  As you moved "east" from the town, you would encounter the jungle.   The island was cut in half by rocky jungle covered hills and a river.  Beyond the river were the natives, sometimes friendly, sometimes head-hunters, sometimes in need of a sacrifice for a festival.  To the north was the coastline, and to south, room for new adventure.

Here is the early version of Ponape:

The Spanish governor usually tried to impose his will (whether it be the Spanish will or not) from the fortress in the distance.  The native village can be seen in the foreground.

A view of the town and bay, better showing the fortress.  The town featured Madam Ophelia's, a trading company, and a black-birder auction.  Local business was overseen by "The Boss" with help from his henchmen and working girls.  Foreign navies would sometimes visit.  Sometimes they could be burdensome, as above, where he bay is blocked by the French ship, the Dunois.

The natives above are preparing for one of their many celebrations.  A festive people, in this case it appears that the antiquarian explorer may have lost his daughter, as she is being assisted in preparation for the native celebration.  Converting the Foundry Africans into Micronesians was only partially successful, as the natives all looked like they had a steady diet of steroids.

Strange alliances often formed.  Here German troops are assisted in leaving the jungle by the natives with Austrians in hot pursuit.

Above, natives invite an English explorer to dinner.  The natives were very friendly that way.

 After the first couple of games, the island suffered some geological activity, which made transit on the island  a little tougher. 


Phase two of Ponape featured more dramatic rocky cliffs cutting the island in half, and the addition of a swamp (not depicted above)  in the jungle.  The natives got a more secluded, less accessible village, and proper place for the their rituals.


A view looking from the fortress toward the new cliffs separating the island natives from the Spanish side of the island.

A view of the dock.


A couple of views showing the northern coast and the river.

Spanish troops looking for ...trouble.  The dramatic height of the new cliffs is demonstrated


Views of the "native" side of the island

 
Eventually the fortress got a minor face lift.  A lot of additional plans were made for the island including detailing existing structure, adding a docking station for the airship, and a small railroad between the mine (yes, there would be a mine) and the dock area.  Only the face lift and some of the minor detail items got completed before Ponape's last game.


The fortress received some battle damage, weathering, and various other details, most of which are not visible in any of the photos that I have. This is how the game looked at its last convention presentation.

 
Ponape proved to be a success, with players contacting me prior to conventions and arranging to bring their own colonial factions that would be worked into the storyline.  The games flowed more like a "B" movie than the typical wargame with homebrew rules that catered to the light-hearted flow of the games.

Ponape also proved to be a bear to transport, requiring about 90 cubic feet of cargo room with very careful planning and packing.   The cargo room problem was the primary reason for developing the next stage of Ponape, Mission to Pingalap, which used many of the components of  the original island, but reduced cargo volume.

Mission to pingalap is up next.

Mission to Pingelap: 28mm Colonial Adventure in the Pacific

$
0
0
The last variation of "Ponape" came in the form of "Mission to Pingelap".  The only negative thing about Ponape was the cargo room needed to transport the game to gaming sites, as my own table was no longer big enough to field the entire terrain set.  This resulted in my adapting some of the Ponape terrain to another island, i.e., a more flexible gameboard requiring less cargo room.  After searching around on the maps of Micronesia, I settled on naming my new island after Pingelap.  In reality, Pingelap is a very small island, an atoll with a central lagoon, and population a little above 200.

For my game, Pingelap was the site of a Christian mission, a native population, and a small trading post/village.  The island map featured coast on opposing ends with the mission on one side, the village on the other, and the natives in the middle.  The interior of the island was quite bumpy (unlike the real island) filled with rocky formations providing plenty of hiding places for pirates, castaways, giant mythical birds, and whatever else might be needed for adventure.


Here is a  photo of part of the island under construction:

The finished sections are from Ponape, losing the fortress and ramp up to it  resulted in a huge space savings during transport. Here is the the above terrain completed:

I believe the complete footprint was 11'x6', about seven feet of the eleven is pictured above.

The new native village...

...the castaway's shack....

...and the Christian mission.

The original Mission to Pingelap scenario centered partially around around a newspaper article by a creative reporter, proclaiming "Vegetarians Eaten by Cannibals", "All lives lost at Pingelap Mission".  This resulted in British and Spanish naval forces responding, who would run into the quite healthy missionaries, an explorer looking for the source of the native giant bird myth, pirates looking to kidnap some natives and to extinguish the mission, etc.

The game looked like this:


The trading post/village side of the island above.


The mission side of the island.

The island interior with many channels created by the rocky formations.  the native village is to the right, and was located near the mission.

Various parties in search of adventure in the distance.

The native tribe investigating all of the recent activity on the island.


Most of the parties found themselves at this site by the end of the game, several meeting their end here.  The mythical bird wasn't a myth, and was discovered by the explorer's party.  The explorer was then discovered by the pirates.  That ended badly for the explorer.   In turn, many pirates died at the sharp end of a beak, but in the end, the bird was no match for so many rifles.  The remaining pirates were no match for the natives, who were no match for the British Navy.  The Spanish must have gotten lost in the jungle, but lived to tell about it.


Though it started with the movie Nate and Hayes, when I realized that the figs were available to create the game, I had no idea how much research I would do for such a whimsical game.  Starting with an investigation of just who this Bully Hayes was, lead to a general history of exploration (and exploitation) of the Pacific peoples and islands,  further leading to study of 19th century China, East Asia, and Australia.  When done I had collected maybe three dozen volumes ranging back to the 1870s, many maps, post cards, and other bits (even an old cigarette card depicting Bully Hayes) offering windows into a fascinating history, otherwise hidden from from me for so many years.  This part of the colonial Victorian era offers a rich, endless source of adventure for the miniatures or role-playing gamer, and from what I can tell is almost completely untapped by the gaming community.

The Ponape games that I ran in the early 2000s remain some of the best gaming experiences that I have shared in.  The best thing about Ponape were the players, and I must thank them all, particularly the guys from Wayne's Legion Historical gamers, and the Colby Street Irregulars.  Truly the best.

A number of factors resulted in temporarily shelving Ponape. Unfortunately, the temporary shelving has stretched into around seven years now.  At one point I considered selling off the figs and getting rid of the terrain, and I did sell some of the extra figs that were never used.  I also considered making some modules that would interface with the colonial terrain, and allow me to use some of it in a post apocalypse setting, or a sci-fi version of Ponape, but don't know  if either will ever materialize.  I am sure that Ponape will rise from the sea once again, as there are simply too many adventures left undone.
Thanks for looking.

Mugabia's New Air Defense Weapon

$
0
0
With my eight month long infantry project all but complete, I got the bug to clean up some of the many half finished projects setting all over the basement.  One of the little heaps of pieces that keeps getting moved around is a number of T34 conversions for my African imagi-nation Mugabia.

Mugabia's air force is somewhat out-classes by Uwanda, and though they have a wide range of anti-aircraft weapons, they have little self-propelled ADA. 


Mugabian air defense, 57mm, 23mm, and 14.5mm guns.

Their dozen or so ZSU-57s  are spread pretty thin, so Mugabia's fledgling arms industry has started converting  T-34 chassis, producing self propelled anti-aircraft weapons from existing stocks.  The first of these is the "ZSU 23/2".

Here are a few pics of the nearly completed prototype:


The ZU23/2 turret is scratch-built from styrene strips and brass rod.  The T-34 chassis is one of my own post-war T-34 castings.  I'm still debating whether to put stowage racks on the hull sides or on a rack over the engine deck.  I will probably stop at two of the ZSU conversions, supported by a single ammo carrier also build on a T-34 chassis.

A minor victory, but at least a few less loose bits are floating around the basement this week.
Viewing all 453 articles
Browse latest View live


Latest Images